 iVIGA Faucet Manufacturer & Factory

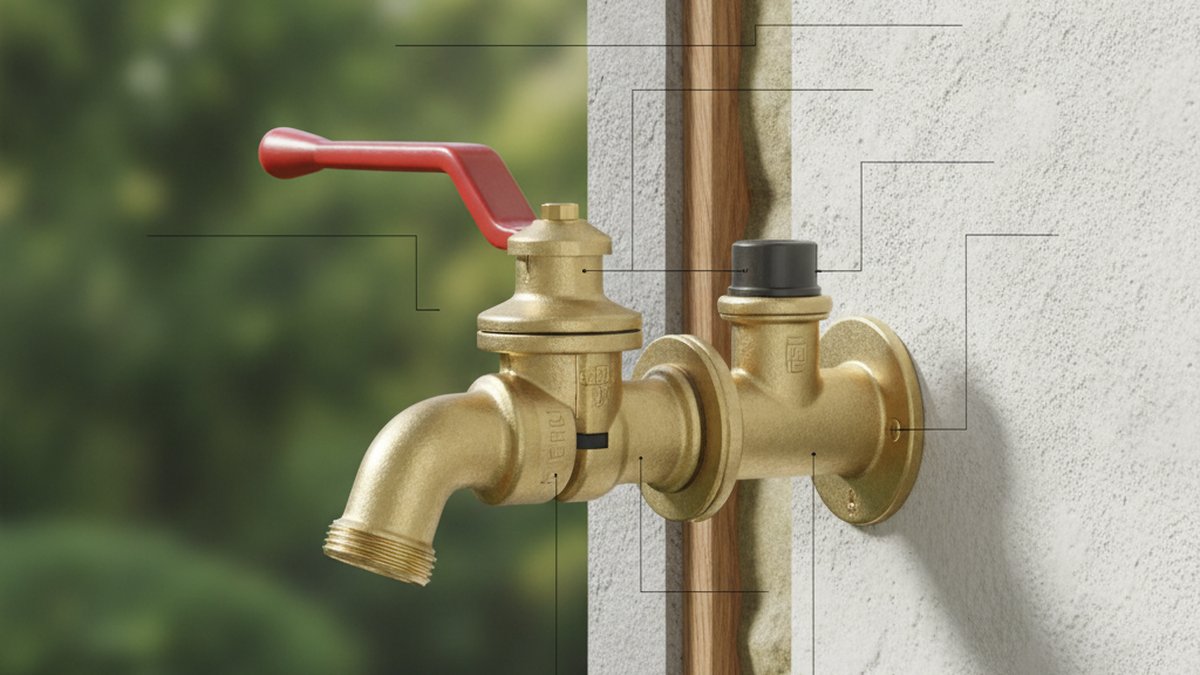
If you’ve been staring at a leaky spigot wondering which piece is failing, an outdoor faucet diagram is the single most useful thing you can look at before you buy a part or a whole new faucet. It’s a simple exploded or cutaway drawing that names each component and shows how they stack together inside the wall and out. Once you can point to “that’s the packing nut, that’s the valve seat, that’s the vacuum breaker,” you stop guessing and start fixing — or you know exactly what spec to order. At iVIGA we get this question constantly from customers deciding between a standard hose bib and a frost-proof model, so let’s walk through the diagram part by part.
What are the parts on an outdoor faucet diagram, from inlet to spout?
Every outdoor faucet diagram, no matter the brand, labels roughly the same ten parts in the same water-flow order. Here’s what each one does, front to back:
- Inlet / supply connection: Where the faucet joins your home’s cold-water pipe inside the wall — usually 1/2″ MIP (male iron pipe) or a sweat/PEX connection.
- Valve seat: The fixed metal ring the washer presses against to stop the water. A pitted seat is the #1 cause of a spigot that drips even after a new washer.
- Washer (seat washer): The rubber disc at the tip of the stem. Cheap to replace and the most common failure point.
- Stem / spindle: The long shaft that moves in and out when you turn the handle, carrying the washer toward or away from the seat.
- Packing nut / packing washer: Seals around the stem so water doesn’t weep out from under the handle when the faucet is on.
- Bonnet (bonnet nut): The large hex nut that holds the whole valve assembly into the faucet body.
- Handle: Wheel, cross, or lever you turn. Held on by a single screw.
- Spout / body: The cast body that directs water out.
- Hose thread (GHT): The 3/4″ garden hose thread on the nose where your hose or splitter screws on.
- Vacuum breaker (backflow preventer): A little cap on the spout that stops contaminated hose water from siphoning back into your drinking supply — code-required in most U.S. jurisdictions.
Read the diagram in that order and you’re essentially tracing the path of the water. When something’s wrong, the symptom tells you which labeled part to check — and that’s where a diagram beats trial-and-error every time.
Which type of outdoor faucet do I have — standard, frost-proof, or ball valve?
You almost certainly have one of three types, and the diagram for each looks slightly different where it counts. A standard hose bib has a short body and puts the washer and seat right at the wall. A frost-proof (freeze-proof) sillcock has a long body — 4 to 24 inches — that moves the valve seat deep inside the heated wall so water drains out after each use and can’t freeze. A ball-valve or quarter-turn hydrant uses a rotating ball instead of a compression washer, so it opens fully with a 90° turn and rarely drips.
The fastest way to tell them apart from a diagram: look at where the valve seat sits relative to the wall. If the seat is at the handle end (outside), it’s a standard bib. If the seat is at the far inside tip of a long tube, it’s frost-proof. This one detail changes how you winterize and what fails.
| Type | Valve seat location | Freeze resistance | Typical price (USD) | Best for |
|---|---|---|---|---|
| Standard hose bib | At the wall / outside | Low — must be shut off & drained | $8–$25 | Mild climates, sheds, quick swaps |
| Frost-proof sillcock | Deep inside heated wall | High — self-draining | $20–$60 | Freezing climates, exterior walls |
| Ball-valve / quarter-turn | Inline ball, no washer | Medium–High | $25–$70 | Frequent use, drip-free operation |
| Yard hydrant | Underground, below frost line | Very high | $60–$150 | Rural, gardens, livestock, far from house |
If you’re in a climate where pipes freeze and you still have a short standard bib, the diagram is telling you to upgrade to frost-proof — it’s the single biggest way to prevent a burst pipe behind the wall.
How do I use the diagram to fix a dripping or leaking outdoor faucet?
Match the leak location to the labeled part, then replace that one piece. A drip from the spout means the washer or valve seat; a leak from under the handle when the water is on means the packing. Here’s the exact sequence:
- Shut off the water to that line (interior shut-off valve or main) and open the faucet to relieve pressure.
- Remove the handle screw and handle — top of the diagram.
- Unscrew the packing nut / bonnet and pull the stem straight out.
- Inspect the washer at the stem tip. Cracked, flattened, or brittle? Replace it. Note the size against the old one.
- Feel the valve seat with a fingertip. Rough or pitted? Reface it with a seat-dressing tool or replace the seat if it’s removable.
- Replace the packing (graphite string or O-ring) if the leak was around the stem.
- Reassemble in reverse order, snug — not gorilla-tight — and test.
This is the same compression-valve logic you’ll find on many indoor fixtures, which is why the skills transfer. If you want a deeper walkthrough of the drip-repair mindset before you start, our guide on how to fix a kitchen faucet drip yourself covers washer and seat diagnosis in detail, and it applies almost one-for-one to a hose bib. And if the faucet won’t turn on at all rather than dripping, start with why your garden hose tap isn’t working and how to fix it fast — that troubleshooting flow pairs perfectly with the diagram.
What thread size and connections does an outdoor faucet use?
Outdoor faucets have two different threads, and the diagram labels both — don’t mix them up. The outlet (where the hose attaches) is 3/4″ GHT (garden hose thread), a coarse, standardized thread found on virtually every U.S. hose, splitter, and timer. The inlet (where it connects to your plumbing) is typically 1/2″ MIP or 3/4″ MIP national pipe thread, or a solder/PEX/push-fit connection depending on your house.
This matters because people order the wrong faucet by looking only at the hose end. The hose end is almost always 3/4″ GHT — the variable is the inlet. Measure the pipe your old faucet screwed into, or the sweat/PEX size, before buying. If you’re new to reading plumbing thread specs, the method in our bathtub faucet thread size guide — how to measure before buying works exactly the same way for a hose bib: count threads per inch and measure the outside diameter, don’t just eyeball it.
What is GHT vs NPT, in plain terms?
GHT (garden hose thread) is a single, universal coarse thread made so any hose fits any spigot without tools — hand-tight with a rubber washer. NPT/MIP (pipe thread) is a tapered thread that seals metal-to-metal with PTFE tape and needs a wrench. Your diagram shows GHT on the outside, NPT on the inside. If you ever need to connect a hose fitting to a pipe fitting, you use a GHT-to-NPT adapter — they are not interchangeable.
Where should I install an outdoor faucet, and what does the diagram tell me about placement?
Install it on an exterior wall over a heated space, sloped very slightly downward toward the outside, with the valve body reaching into conditioned space if it’s frost-proof. The diagram’s wall cross-section is the key: for a frost-proof sillcock to self-drain, the whole body must tilt down toward the spout so trapped water runs out when you disconnect the hose. Mount it level or tilted the wrong way and even a “frost-proof” faucet will hold water and freeze.
A few placement rules the diagram makes obvious:
- Keep the spout at least 12 inches above grade so a hose and splitter clear the ground.
- Choose a length so the valve seat lands inside your insulated wall cavity — measure wall thickness plus siding.
- Leave the vacuum breaker unobstructed; it needs air to work and to be reachable if it ever weeps.
- Add an accessible interior shut-off on the supply line so you can winterize without hunting for the main.
How do I choose a durable, high-quality outdoor faucet?
Buy a lead-free brass or bronze body, a frost-proof design if you get freezing weather, a built-in vacuum breaker, and a quarter-turn ceramic or ball valve if you want drip-free longevity. Plastic-bodied hose bibs are cheapest but crack and fail; the body material on the diagram is where you should spend. Brass resists corrosion, handles pressure, and threads cleanly — it’s why premium fixtures are built from it.
If you want to understand why body material is the make-or-break spec, our deep dive on brass vs stainless steel faucet manufacturing explains the corrosion, casting, and pressure-handling differences that separate a faucet that lasts 20 years from one that fails in three. For an outdoor faucet exposed to weather and freeze cycles, that material choice matters even more than it does indoors.
iVIGA outdoor and frost-proof spigots are cast from lead-free brass, pressure- and cycle-tested, and finished to resist the UV, rain, and temperature swings an exterior fixture actually faces. Look for these when you compare any brand:
- Lead-free brass body (compliant with U.S. drinking-water standards).
- Integrated backflow preventer / vacuum breaker.
- Ceramic-disc or ball valve for quarter-turn, drip-free control.
- Frost-proof length matched to your wall thickness.
- A real warranty and clear replacement-part availability.
FAQ
Why does my outdoor faucet still drip after I replaced the washer?
Because the valve seat behind the washer is pitted or corroded. On the diagram, the seat is the fixed ring the washer presses into — if its surface is rough, a brand-new washer can’t seal against it. Reface the seat with a seat-dressing tool, or replace the seat if it’s the removable type. On frost-proof models, a worn stem washer deep inside the wall is often the culprit, so pull the full stem to inspect it.
What’s the difference between a hose bib, a spigot, a sillcock, and a faucet?
They’re mostly the same thing with regional names. “Hose bib” and “spigot” usually mean a standard outdoor tap; “sillcock” specifically means the long frost-proof version that passes through the sill/wall; “outdoor faucet” is the general umbrella term. On a diagram they share the same core parts — the difference is body length and where the valve seat sits.
Do I really need a vacuum breaker on an outdoor faucet?
Yes, and it’s usually required by plumbing code. The vacuum breaker (labeled at the spout on most diagrams) stops backflow — if pressure drops in your home lines while a hose sits in a pool, fertilizer sprayer, or dirty bucket, that contaminated water could siphon back into your drinking supply. Many modern hose bibs have it built in; older ones can take an add-on that screws onto the hose threads.
How do I winterize the faucet using the diagram as a guide?
For a standard bib: close the interior shut-off valve on the supply line, open the outdoor faucet, and let it drain fully. For a frost-proof sillcock: simply disconnect the hose — leaving a hose attached traps water at the spout and defeats the self-draining design shown in the diagram, which can burst the pipe. Add an insulated faucet cover for extra protection in hard freezes.
Can I replace a standard hose bib with a frost-proof one myself?
Often yes, if the connection is threaded and accessible — shut off and drain the line, unthread the old bib, wrap the new inlet threads with PTFE tape, and thread in a frost-proof model sized to your wall thickness. Sweat/soldered or in-wall connections are a job for a plumber. Always match the inlet thread and length using the measurements from the diagram before you buy.
What size is the hose connection on an outdoor faucet?
Almost universally 3/4″ GHT (garden hose thread) in the U.S. — that’s why any standard garden hose, splitter, or timer fits. The part that actually varies is the inlet at the wall (commonly 1/2″ MIP), so measure that side, not the hose side, when ordering a replacement faucet.
The bottom line on reading an outdoor faucet diagram
An outdoor faucet diagram turns a mystery lump of metal on your wall into a set of ten labeled, understandable parts. Use it to identify your type (standard, frost-proof, ball valve, or hydrant), to pinpoint exactly which part is leaking, and to order the right replacement thread and length the first time. Spend your money on a lead-free brass body with a real valve and a vacuum breaker, size it to your wall and climate, and a good outdoor faucet will outlast the hose you screw onto it.
Author note: This guide was written by the iVIGA fixtures team, drawing on hands-on faucet R&D and field feedback from installers and homeowners across freezing and mild climates. iVIGA designs and manufactures kitchen, bath, and outdoor fixtures cast from lead-free brass and validated with pressure, flow, and freeze-cycle testing against recognized U.S. plumbing standards, backed by a manufacturer warranty and available replacement parts. Always follow local plumbing code and, for in-wall or soldered connections, consult a licensed plumber.
WeChat
Scan the QR Code with WeChat