 iVIGA Faucet Manufacturer & Factory

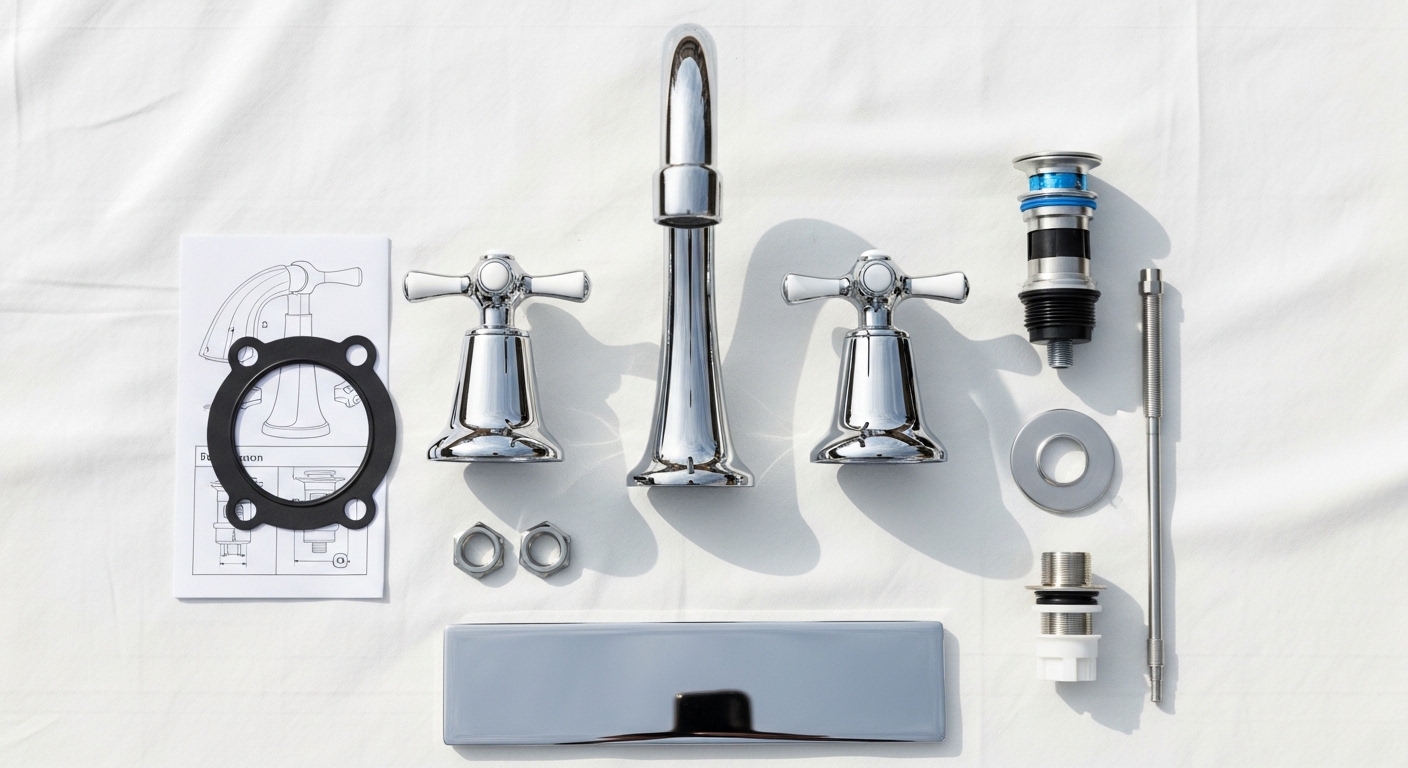
If you’ve just unboxed a new Dover-style fixture and you’re hunting for clean, no-nonsense dover centerset bath faucet installation instructions, this guide walks you through the whole job — from prepping the sink to chasing down that one drip that always shows up on the first test. It’s written for a real homeowner with a flashlight and a basin wrench, not a plumber with a van full of fittings.
The good news: a centerset bath faucet is genuinely one of the easiest plumbing swaps in the house. The three mounting posts are pre-attached to a single deck plate, the supply lines are short, and you’re working with standard 1/2-inch shutoff valves under a small sink. If you can change a showerhead, you can do this. The trick is doing it in the right order so you don’t have to crawl back under the sink twice.
What exactly is a “Dover centerset” faucet, and is mine actually one?
A Dover centerset is a 4-inch, three-hole bathroom faucet where the spout and both handles sit on a single base plate. The “Dover” name is a styling family (clean transitional lines, gooseneck or low-arc spout, often paired with cross or lever handles) — not a unique installation standard. If your sink has three holes spaced 4 inches center-to-center, this faucet will fit.
You’ll know it’s a centerset (vs. a widespread) because the handles are physically attached to the spout body by a metal underbody — there’s no separate handle-to-spout supply tubing. That single-unit design is exactly why installation is so quick. For a deeper comparison, our breakdown of 4-inch centerset vs. 8-inch widespread faucets explains which sink drillings each style is meant for.
How do I confirm the 4-inch hole spacing before I start?
Measure from the center of the left hole to the center of the right hole. If it’s exactly 4 inches (102 mm), you have a true centerset drilling and a Dover-style faucet will drop in. If it’s 6-8 inches, you’ve got a widespread sink and the centerset will not span the gap — you’d need a different faucet, or a sink with a single-hole or 4″ drilling. Don’t try to “make it work” with a plate that’s too small; the deck plate is sized to cover all three 4-inch holes and nothing wider.
What tools and parts do I actually need on the floor before I start?
You need five things within reach: a basin wrench, an adjustable wrench, two 3/8″ compression supply lines (usually 16-20″ long), plumber’s putty or silicone, and a small bucket. Everything else is optional but helpful.
- Basin wrench — the long-handle wrench with a pivoting jaw. This is non-negotiable for reaching the mounting nuts behind the sink basin.
- Adjustable crescent wrench (8-10″) — for the supply line nuts at the shutoff valves.
- Two flexible braided supply lines, 3/8″ compression x 1/2″ FIP — most Dover-style faucets ship with 3/8″ male inlets; confirm before buying.
- Plumber’s putty OR the silicone gasket included in the box — never use both. Modern Dover kits usually include a foam or rubber base gasket; use that and skip the putty.
- Bucket and old towel — for the residual water that always drains out of the supply lines when you disconnect the old faucet.
- Penetrating oil (PB Blaster or WD-40 Specialist) — for any seized nut on the old faucet.
- Flashlight or headlamp — the cabinet under the sink is dark.
- Phillips and flathead screwdrivers — for handle set screws and shutoff valve adjustments.
A quick note on supply lines: don’t reuse the old ones. Braided stainless lines are $4-8 each and they’re the single most common leak source on a faucet swap. Buy two new ones.
How do I remove the old faucet without breaking the shutoff valves?
Shut both supply valves clockwise until snug, turn the faucet on to release pressure, then disconnect the supply lines at the valve first (not at the faucet). Disconnecting at the valve gives you more room to work and protects the faucet inlets if you have to wrestle a stuck nut.
- Close both angle stops under the sink (turn the oval knob clockwise until it stops). If a valve is seized or weeping, replace it now — a 1/4-turn ball valve is a 20-minute upgrade and saves you the next emergency.
- Open both handles on the old faucet and let any trapped water drain into your bucket.
- Loosen the compression nuts on the supply lines at the shutoffs with your adjustable wrench. Have a rag ready.
- Climb under the sink and use the basin wrench on the mounting nuts holding the old faucet to the deck. Turn counter-clockwise. If they’re chalky and stuck, spray penetrating oil and wait 10 minutes.
- Lift the old faucet straight up. Scrape any old putty, silicone, or limescale off the sink deck with a plastic scraper — don’t gouge porcelain or chrome.
What if the shutoff valve is leaking or won’t close all the way?
Stop, turn off the main house water, and replace the angle stop before going further. A bad shutoff that drips even slightly will eventually ruin your new install and warp the cabinet floor. Compression-style 1/4-turn ball valves are simple to swap and cost under $15. Our guide to the 5 most common bathroom faucet problems and their fixes covers shutoff failures and three other issues you’d rather catch now than later.
What’s the correct step-by-step install procedure for the new Dover faucet?
Set the gasket, drop the faucet in, tighten the mounting nuts hand-tight plus a quarter turn, then connect the supply lines bottom-up (valve first, faucet second). Test before you ever reinstall the aerator.
- Prep the deck. The sink surface should be dry and clean. If your kit included a foam or rubber gasket, place it on the underside of the deck plate. If not, lay a thin rope of plumber’s putty around the base of the deck plate. Don’t use both.
- Drop the faucet in. Feed the supply tails and any drain rod through the center hole and the two outer mounting posts through the side holes. Press the faucet down evenly.
- Secure from below. From under the sink, thread the friction washer and mounting nut up each post. Hand-tighten, then use the basin wrench for a final quarter turn. Don’t overtighten — porcelain sinks crack, and the rubber gasket only needs to compress, not flatten completely.
- Confirm the faucet is centered and square from above before you go any further. A crooked faucet is much easier to fix now than after the supply lines are on.
- Connect the supply lines. Hand-thread the supply line nuts onto the faucet tails (hot to hot, cold to cold — almost always left/red is hot, right/blue is cold), then finger-tight the other ends to the shutoff valves. Use the adjustable wrench for one final 1/2 to 3/4 turn. Don’t crank.
- Install the pop-up drain if it came with the kit. The lift rod feeds down through the hole behind the spout, connects to the horizontal pivot rod with a clevis strap, and the pivot rod threads into the back of the drain tailpiece.
One detail that catches first-timers: most modern Dover-style faucets ship with the aerator installed but with a small protective screen inside it. Leave the aerator off for the first test so any installation debris flushes out instead of clogging the screen.
How do I test for leaks and what do I do if I find one?
Open the shutoff valves slowly, run hot and cold for 60 seconds each, then run them together. Look under the sink with a flashlight at every joint and at the deck gasket from above. A single drip in 60 seconds is still a leak — fix it now.
| Leak Location | Likely Cause | Fix |
|---|---|---|
| At the shutoff valve nut | Compression nut under-tightened | 1/4 turn more with adjustable wrench |
| At the faucet supply tail | Crossed threads or worn washer | Back off, re-thread carefully, replace washer |
| Around the deck plate base | Mounting nuts uneven or gasket pinched | Loosen, reseat gasket, re-tighten evenly |
| From the spout when off | Cartridge debris or damaged O-ring | Flush lines, then reseat cartridge |
| Around the handle base | Loose packing nut on cartridge stem | Snug the bonnet nut, don’t overtighten |
| From the pop-up drain | Tailpiece not seated with plumber’s putty | Disassemble drain, reapply putty, reassemble |
Why does my new faucet have low water pressure after install?
It’s almost always debris in the aerator from flushing the lines, not a defective faucet. Unscrew the aerator (turn counter-clockwise looking up from below the spout, or use a coin in the slot of a hidden aerator), rinse the screen, and reinstall. If pressure is still low after that, check that both shutoff valves are fully open — partially closed valves are the second most common cause.
How does a centerset compare to widespread and single-hole faucets for a small bathroom?
For a standard 4-inch drilled bathroom sink, centerset is the right answer 90% of the time — it’s faster to install, less expensive, and easier to clean around. Widespread becomes worthwhile only when you have an 8-inch drilled sink or specifically want the two-handle spread look on a larger vanity. If you’re choosing between styles before you buy, our single hole vs. widespread comparison and our explainer on why so many bathrooms use 4-inch centerset faucets walk through the tradeoffs.
| Faucet Type | Sink Drilling | Install Time | Typical Price Range | Best For |
|---|---|---|---|---|
| Centerset (Dover style) | 3-hole, 4″ centers | 30-60 min | $60-$220 | Small to mid-size baths, powder rooms, secondary baths |
| Widespread | 3-hole, 6-16″ spread | 60-120 min | $140-$500+ | Larger vanities, master baths, design-forward installs |
| Single-hole | 1-hole | 20-45 min | $50-$300 | Modern vessel sinks, minimalist installs |
| Wall-mount | 0-hole (wall plumbing) | 2-4 hrs + drywall | $200-$900+ | Vessel sinks, custom builds |
How do I keep my Dover faucet looking new for the next 10 years?
Wipe the finish dry after each use, never use abrasive cleaners or scouring pads, and clean the aerator every 6 months. That’s 90% of the maintenance for any quality chrome or brushed-nickel centerset.
For hard-water areas, soak the aerator in 50/50 white vinegar and water for an hour twice a year — limescale buildup is the #1 reason “good” faucets start to feel weak after a few years. If you’re on well water or extremely hard municipal water and noticing scale on the spout, a faucet water filter head can dramatically extend the life of cartridges, aerators, and the finish itself. Avoid bleach-based cleaners on any plated finish — they pit chrome and discolor brushed nickel within a few weeks of repeated contact.
One more pro tip: if you ever need to remove the handles for cartridge service, the set screw is hidden under a small decorative cap on the front or top of each handle. Pry the cap off with a fingernail, not a screwdriver, or you’ll chip the finish.
What standards and warranty should a real Dover-style faucet meet?
A faucet you’re installing in a U.S. or Canadian bathroom should be cUPC and NSF/ANSI 61 certified, have a flow rate at or below 1.2 GPM (WaterSense) or 1.5 GPM (standard), and carry a manufacturer’s limited lifetime warranty on the body and finish plus 5 years on the cartridge. Anything less and you’re buying a faucet that will need replacing within a few years.
VIGA’s Dover-style centerset faucets are built around a forged lead-free brass body, use ceramic-disc cartridges rated for 500,000 cycles, and are independently tested to UPC and cUPC standards. Why does that matter? Because the brass body is what gives you a leak-free joint for 15-20 years instead of 3-5 — and we’ve covered why brass remains the gold standard for plumbing components in a dedicated article. Always register your faucet within 30 days of installation to activate the full warranty period.
FAQ
Can I install a Dover centerset bath faucet myself without a plumber?
Yes — this is one of the most beginner-friendly plumbing jobs in the house. If you have functioning shutoff valves under the sink and a basin wrench, you can complete the install in under an hour. The only times you’d want a plumber: if the shutoff valves are seized, if you have galvanized supply pipes, or if you’re switching from a centerset to a widespread (which requires re-drilling the sink).
Do I need plumber’s putty or silicone under the deck plate?
Use whatever your faucet kit includes. Most modern Dover-style faucets ship with a pre-cut foam or rubber gasket that seals perfectly on its own — adding putty on top of it can actually prevent a tight seal. Use plumber’s putty only if no gasket is provided, or if your sink deck is uneven and the gasket can’t fully bridge the gap.
Why is my new faucet dripping from the spout after install?
Almost always installation debris caught in the cartridge. Shut off both supplies, remove the cartridge per the included diagram, flush each supply line into a bucket for 5-10 seconds, then reseat the cartridge. If it still drips after that, the cartridge itself is defective and any reputable manufacturer (including VIGA) will ship a free replacement under warranty.
How tight should the mounting nuts under the sink be?
Hand-tight plus a quarter to half turn with the basin wrench. The rubber gasket should look compressed but not crushed flat. Overtightening cracks porcelain sinks, strips the plastic mounting threads on many modern faucets, and can warp the deck plate. If you can wiggle the faucet by the spout, tighten more; if you can’t, stop.
Can I use the old supply lines from my previous faucet?
Don’t. Braided stainless supply lines are $4-8 each and they’re the single most common leak point on a bathroom install. Rubber washers compress over time, threads can be slightly damaged from the previous install, and you’ve got no warranty if a 7-year-old hose fails behind a vanity. Always install new supply lines with a new faucet.
What’s the difference between a Dover-style faucet and other centersets?
“Dover” refers to a specific aesthetic family — transitional, clean-lined, often with a gentle gooseneck spout and either cross or lever handles. Functionally, it installs identically to any other 4-inch centerset. So these instructions apply to virtually any Dover-style centerset faucet from any reputable manufacturer, including VIGA’s own Dover-series fixtures.
How long should a quality centerset bath faucet last?
A well-installed lead-free brass faucet with a ceramic-disc cartridge will run 15-20 years before needing anything beyond an aerator clean or a $15 cartridge swap. Cheap zinc-alloy faucets, by contrast, often start corroding internally within 3-5 years. The body material is by far the biggest predictor of lifespan — finish and brand name matter much less.
About the author and brand
Written by the VIGA technical content team and reviewed by a licensed master plumber with 18 years of residential and light-commercial installation experience. VIGA is a Kaiping, China-based manufacturer of OEM and branded bath and kitchen fixtures, supplying retailers and contractors across North America, Europe, and Australia since 2003. Every Dover-series faucet ships from an ISO 9001-certified facility, is pressure-tested to 1.5x working pressure before packing, and carries a limited lifetime warranty on body and finish. Specifications and installation may vary slightly by model — always confirm against the printed instructions in your specific kit.
WeChat
Scan the QR Code with WeChat