 iVIGA Faucet Manufacturer & Factory

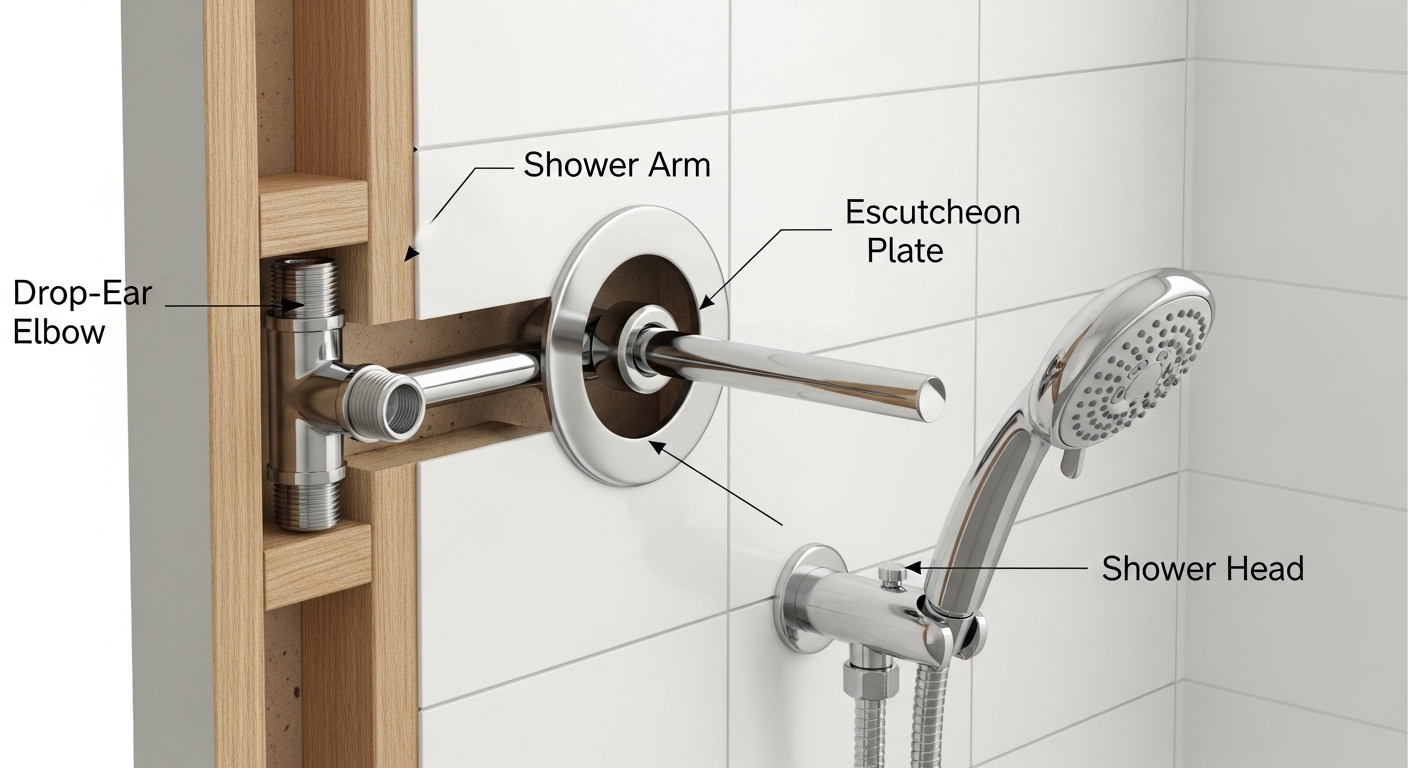
If you’re wondering how to change shower head location because the spray hits your chest instead of your shoulders, or because a taller person keeps ducking, you’re asking the right question — and the good news is you almost never need a plumber or a demolished wall to fix it. The height and angle of your shower head are controlled by the shower arm (the chrome pipe sticking out of the wall) and the fitting behind it called the drop-ear elbow. Change the arm, and you change where the water comes from. Change the elbow, and you’ve made a permanent relocation. Which path you take depends entirely on how far you need to move it and whether you’re willing to open the wall.
Below, I’ll walk you through every method — from a 20-minute no-tools tweak to a full in-wall relocation — with exact heights, the parts you’ll need, and how to avoid the leaks that catch DIYers. I’ve installed and troubleshot hundreds of shower arms, and the biggest mistake I see is people trying to force a big move with the wrong method.
Can you move a shower head higher without opening the wall?
Yes — for most height changes, you can raise (or lower) a shower head without ever touching the wall. The trick is to replace the standard shower arm with an adjustable extension arm, an S-shaped arm, or a gooseneck arm. These thread onto the exact same fitting your current arm uses, so it’s a pure swap — no tile, no drywall, no plumber.
Standard shower arms come out of the wall at roughly 78–80 inches from the floor. That’s fine for average heights, but it leaves tall users hunched. Here’s what each arm type buys you:
| Arm type | How much it moves the head | Wall damage? | Best for |
|---|---|---|---|
| Standard straight arm | None (baseline) | No | Replacing a worn arm like-for-like |
| S-shaped / offset arm | +3 to +6 in. higher, ~4 in. forward | No | Taller users, more headroom |
| Adjustable extension arm | +8 to +16 in., angle adjustable | No | Rainfall heads, big height gains |
| Gooseneck / high-arc arm | +10 to +15 in. up and over | No | Overhead rain-style spray |
| Relocated drop-ear elbow | Anywhere you re-plumb it | Yes (open wall) | Permanent, large repositioning |
An adjustable extension arm is the single most useful upgrade here. It has one or two pivot joints, so you can push the head up, pull it forward, and aim it exactly where you stand. Pair it with a rain-style head and you’ve essentially recreated an overhead shower for the cost of a $25 arm. If you’re leaning that direction, our guide on choosing a rainfall shower head with handheld combo covers which heads work best on an extended arm.
How do I actually swap the shower arm — step by step?
Swapping a shower arm takes about 20–30 minutes and needs almost no tools: a wrench, some plumber’s tape, and a rag. Here’s the exact sequence.
- Unscrew the old shower head from the end of the arm (turn counterclockwise; hand-tight is usually enough, but a wrench with a rag over the finish helps if it’s stuck).
- Grip the arm and unscrew it from the wall. Wrap a rag around it to protect the chrome, then turn counterclockwise. It threads into the drop-ear elbow inside the wall. Turn slowly and steadily — don’t jerk it, or you risk cracking the elbow.
- Clean the elbow threads. Reach in with a rag and wipe off old tape and gunk. If you can see the brass fitting, good — that’s your target.
- Wrap the new arm’s wall-end threads with 4–6 wraps of PTFE plumber’s tape, clockwise, so it doesn’t unravel when you screw it in.
- Thread the new arm in by hand until snug, then give it another quarter-to-half turn with a wrench so the arm points slightly downward and the escutcheon (the decorative flange) sits flush to the wall.
- Wrap the head-end threads, attach your shower head, and turn the water on to check for drips at both joints.
The most common leak point is the wall connection, and it’s almost always from too little tape or cross-threading. If water weeps from where the arm meets the wall, back it out, re-tape, and try again — don’t just crank it tighter. Over-tightening is how people crack the in-wall elbow, which turns a 30-minute job into an open-wall repair.
How do I make my shower head adjustable instead of fixed?
If the real problem is that different people need the water at different heights, don’t move the head — make it movable. Two setups solve this permanently:
- Handheld shower on a slide bar: A vertical bar mounts to the wall, and the handheld head clips onto a bracket that slides up and down. Anyone can set their own height in seconds. The slide bar does need two anchor screws into the wall, ideally into a stud or with proper tile anchors.
- Handheld on a drop hose from the existing arm: No wall drilling at all. You screw a bracket/diverter onto your current shower arm, hang the handheld from it, and pull it down when you want to aim it. This is the true zero-damage option.
A handheld combo is honestly the most flexible fix for a household with mixed heights, kids, or anyone who needs to rinse without full-body spray. It also makes cleaning the shower and bathing pets far easier. If you’re weighing fixed versus handheld before you commit, our comparison of the best shower faucet and head combo breaks down when each makes sense.
What if I need to move the shower head to a completely different spot on the wall?
Moving the shower head to a genuinely different location — say, to the opposite wall, or a foot to the side — means relocating the drop-ear elbow inside the wall, and that requires opening the wall. There’s no way around it: the water pipe rises inside the wall cavity to a fixed elbow, and that elbow is where the arm threads in. To move the exit point, you move the elbow.
Here’s what that job actually involves:
- Access the pipe. If there’s an access panel behind the shower (in a closet or adjacent room), use it. Otherwise you’ll cut into the shower-side tile/drywall or, better, open the back side of the wall to avoid tile damage.
- Shut off the water to the bathroom or the whole house, and open a lower faucet to drain the line.
- Cut the existing riser pipe and re-route it (in copper, PEX, or CPVC) up to the new height/location.
- Secure a new drop-ear elbow to solid blocking between studs so the arm has something rigid to thread into — a wobbly elbow leaks and cracks.
- Pressure-test, then close and re-tile the wall.
This is a real plumbing project. If you’re comfortable soldering copper or crimping PEX and you have back-side access, it’s a doable weekend job. If it means cutting tile you can’t match, hire a pro — the labor is worth it to avoid a botched waterproofing job that leads to hidden mold. Before you commit to opening the wall, ask yourself honestly whether an extension arm or gooseneck gets you 90% of the way there without the demolition. Nine times out of ten, it does.
How high should a shower head be after I move it?
Aim for 80 inches from the floor to where the arm exits the wall for a standard head, and 84 inches or higher for a rainfall/overhead head so tall users don’t hit it. The old code-minimum of 78 inches is fine for shorter households, but if anyone in the home is over six feet, go higher — you want the water arcing down onto the top of the shoulders, not spraying you in the collarbone.
Quick reference for setting the exit height:
| Situation | Recommended arm exit height | Best arm type |
|---|---|---|
| Average height, standard head | 78–80 in. | Straight or S-arm |
| Tall users (6 ft+) | 82–84 in. | S-arm or extension |
| Rainfall / overhead spray | 84–90 in. | Gooseneck / adjustable extension |
| Kids or seated bathing | Any + handheld | Slide bar handheld |
Remember that the head itself hangs below the arm, and the spray face angles downward — so a rainfall head on an 84-inch gooseneck still gives you comfortable clearance. When in doubt, hold the arm and head against the wall (dry-fit) and stand under it before you tape anything up.
Will changing the shower head location hurt my water pressure?
A simple arm swap won’t change your water pressure — the pipe diameter and supply are the same. But two things related to relocation can affect pressure. First, very long extension arms or added hoses create a tiny amount of extra flow resistance; it’s usually unnoticeable, but a cheap kinking hose can restrict flow. Second, if you re-plumb the riser and accidentally use a smaller-diameter pipe or add sharp elbows, you can lose pressure. Keep the riser at the same diameter as the original (typically ½ inch) and use sweeping bends where you can.
One more thing: if your pressure is already weak, moving the head won’t fix it, and a rainfall head will feel even softer because it spreads the same flow over a bigger area. In that case, look at your head’s flow rate and your home’s pressure before you upgrade. If you like the drenching look but have modest pressure, a square rainfall shower head with a lower rated GPM and a pressure-optimized spray plate will feel better than a bargain unit with a wide-open face.
What tools and parts do I need before I start?
For the no-wall methods, you need surprisingly little. Gather this before you begin so you’re not making a hardware-store run mid-project:
- New shower arm (S-arm, gooseneck, or adjustable extension) or a handheld combo kit
- PTFE plumber’s tape (the thicker pink/blue kind seals better than thin white)
- An adjustable wrench or channel-lock pliers
- A clean rag (protects finishes and improves grip)
- A drill with the right anchors — only if you’re mounting a slide bar
- For an in-wall move: a pipe cutter, fittings, a drop-ear elbow, and blocking lumber
If while you’re in there you discover corroded threads or a stuck arm, that’s the same skill set covered in our walkthrough on changing a bathroom faucet setup for a shower — the thread-sealing and leak-checking principles carry straight over. And if you run into a too-short pipe stub behind the wall, the fixes in our guide to a tub spout pipe that’s too short apply to shower risers as well.
FAQ
Can I change my shower head location myself without a plumber?
Yes, for height and angle changes. Swapping to an S-arm, gooseneck, or adjustable extension arm is a 20–30 minute DIY job needing only a wrench and plumber’s tape. You only need a plumber (or advanced DIY skills) if you’re relocating the in-wall drop-ear elbow, which requires opening and re-sealing the wall.
How far can an extension arm move my shower head?
Adjustable extension arms typically move the head 8 to 16 inches higher and several inches forward, with pivot joints that let you aim the spray. Goosenecks raise it 10 to 15 inches in a high arc. For anything beyond that — a move to a different wall — you have to relocate the plumbing inside the wall.
Do I need to shut off the water to swap a shower arm?
No. Because the shower valve holds the water back at the handle, you can unscrew and replace the arm with the water off at the handle only. You just need to make sure no one turns the shower on mid-swap. You do need to shut off the main supply if you’re cutting into the riser pipe inside the wall.
Why does my shower arm leak after I moved it?
Almost always insufficient or improperly wrapped plumber’s tape, or cross-threading. Back the arm out, clean the threads, wrap 4–6 turns of PTFE tape clockwise, and re-thread by hand first to avoid cross-threading. Don’t fix a leak by over-tightening — that can crack the in-wall elbow and create a much bigger problem.
Is a handheld on a slide bar better than moving the fixed head?
For households with users of different heights, yes. A slide bar lets everyone set their own height instantly, and a handheld makes rinsing and cleaning far easier. A fixed head is a single compromise height, so if flexibility is your goal, the handheld-plus-slide-bar route usually beats relocating a fixed head.
Will a longer or relocated shower head lower my water pressure?
A standard arm swap won’t. Very long hoses or a re-plumbed riser with smaller pipe or sharp bends can slightly reduce flow. Keep the pipe diameter the same (usually ½ inch) and avoid kinking hoses. If pressure is already low, a wide rainfall head will feel weaker regardless of location.
A note on getting this right
Author’s note: This guide is written by the vigacc fixtures team, drawing on hands-on experience installing and troubleshooting shower arms, valves, and heads across thousands of bathrooms. We manufacture and test shower fixtures to standard flow-rate and durability benchmarks, and our shower arms and heads are backed by a manufacturer warranty — so whether you’re doing a quick extension-arm swap or a full relocation, the parts you thread into your wall are built to seal and last. When you’re unsure whether a job crosses from DIY into in-wall plumbing, err toward the reversible, no-damage method first; you can always escalate, but you can’t un-cut a tiled wall.
WeChat
Scan the QR Code with WeChat