 iVIGA Faucet Manufacturer & Factory

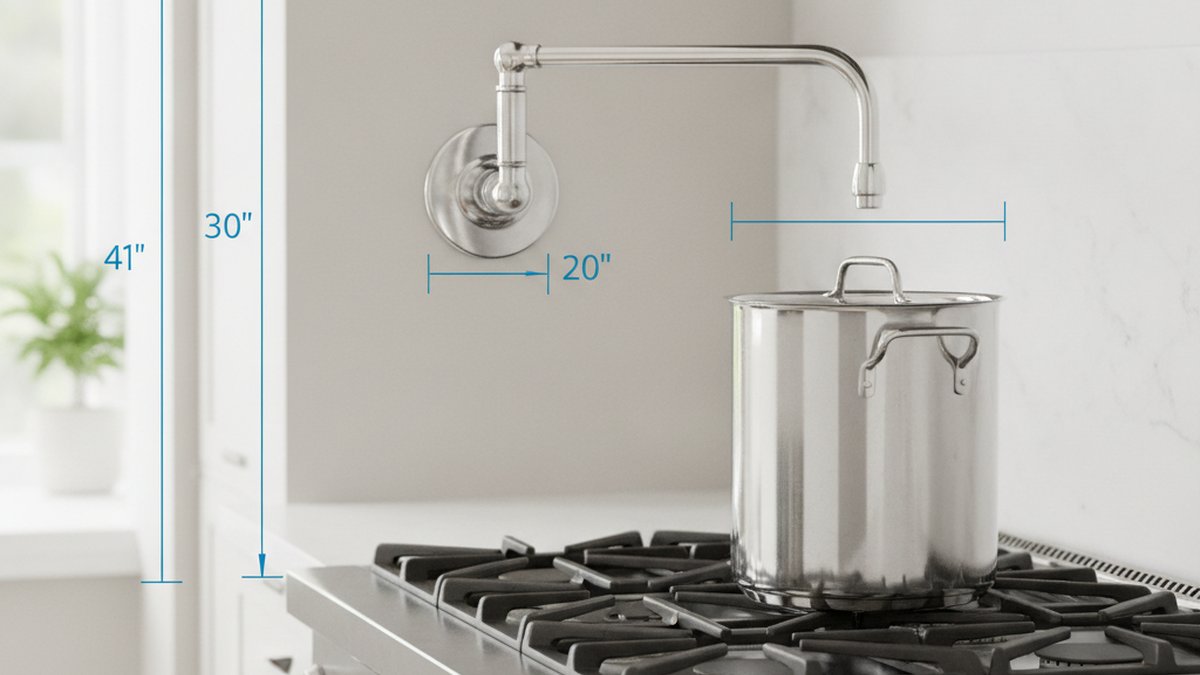
Getting pot filler faucet placement right is the difference between a fixture you use every day and an awkward arm bolted to the wall that dribbles behind the pan. A pot filler is a cold-water-only articulating faucet mounted on the wall (or occasionally a deck) directly over your range, so you fill heavy stockpots where they already sit instead of lugging them from the sink. Because it lives in the splash zone of a hot cooktop and has to fold flat against the wall when not in use, its exact height, horizontal centering, and reach all have to be dialed in before the plumber cuts into the wall. Below is exactly where to put it, the measurements that matter, and the mistakes that force people to re-tile a backsplash.
How high should a pot filler be mounted above the stove?
Mount the supply outlet 18–20 inches above the finished countertop, which typically lands the spout 8–12 inches above the actual cooking grates. That range is the sweet spot: high enough to slide a 12- to 14-inch stockpot underneath, low enough that water doesn’t splash violently or fold the joint into an awkward reach.
The number people quote most often is “about 20 inches above the counter,” but the measurement that actually matters is clearance above the cooking surface, not the counter. A gas range with tall cast-iron grates sits higher than a flat induction top, so measure from the surface your pots will rest on. Here’s the practical test: take your tallest pot, set it on the back burner, and add roughly 3–4 inches of breathing room above the rim. That’s where the spout outlet should hover when the arm is extended and pointed down.
If you install it too high, you get two problems — a long unsupported splash of water that spatters, and an arm that’s hard to unfold and steer for shorter cooks. Too low, and your everyday stockpot won’t clear it, which defeats the entire purpose. When in doubt on a standard 36-inch-high counter, 20 inches above the counter is a safe default.
Where should the pot filler be centered — over which burner?
Center the pot filler horizontally over the back-center burner (or the midpoint of the cooktop if there’s no true center burner), never over a front burner. This keeps the folding arm and its water stream away from your body and lets the spout reach forward burners when extended.
The whole point of a double-jointed pot filler is reach. A good articulating arm extends 18–24 inches, so mounting it at the horizontal center of the range lets you swing it to fill a pot on any burner — back or front, left or right — then fold it flat against the backsplash. If you off-center it toward one side, you lose the ability to reach the opposite front burner, and the folded arm looks lopsided over the range.
One more centering rule: keep the mounting flange far enough above the burners that the escutcheon and joints aren’t sitting directly in rising heat and grease. That’s another reason the back-center, higher position wins over anything low or front-biased.
- Horizontal: dead center of the cooktop width, aligned with the back-center burner.
- Vertical: supply outlet 18–20 in. above counter / 8–12 in. above the cooking surface.
- Reach: pick an arm that extends at least to the front burners (18 in.+ of usable reach for a 30-in. range).
- Fold clearance: confirm the folded arm clears any hood, shelf, or upper cabinet.
Does the water supply line go in the wall — and where exactly?
Yes. A wall-mounted pot filler needs a single 1/2-inch cold-water supply line stubbed out through the backsplash at the exact mounting height, ideally 18–20 inches above the finished countertop and horizontally centered over the range. This has to be roughed in before the drywall, backer board, and tile go up.
This is the step people regret skipping. The rough-in valve and stub-out location get locked in during the plumbing phase, long before you’re standing at the stove imagining where the arm should be. Give your plumber three numbers in writing: height above the finished counter (not the subfloor), horizontal center point measured from a fixed wall or cabinet edge, and the depth the stub-out should sit relative to the finished tile face so the escutcheon seats flush.
Because a pot filler is cold-water only, there’s no hot line and no drain to plan — it’s genuinely simpler plumbing than a sink faucet. But it lives inside an exterior or interior wall, so if you’re in a cold climate and the range backs to an exterior wall, keep the supply line on the warm side of the insulation to avoid a freeze risk. If you’re mapping out plumbing rough-ins around the kitchen at the same time, our guide on getting the spacing right for a wide faucet sink setup walks through the same “measure before you cut” discipline for the main sink.
Wall-mounted vs. deck-mounted pot filler: which placement suits your kitchen?
Choose a wall-mounted pot filler for almost every range against a wall, and a deck-mounted (countertop) pot filler only for islands or peninsulas where there’s no wall behind the cooktop. The mount type is dictated by your layout more than by preference.
Wall-mounted is the classic look and the most common install: the arm folds flat against the backsplash and stays out of the way. Deck-mounted pot fillers rise from the countertop beside the cooktop and are the go-to for island ranges, but they take up counter real estate and the shorter base can limit reach to far burners. Here’s how the placement math differs:
| Factor | Wall-Mounted Pot Filler | Deck-Mounted Pot Filler |
|---|---|---|
| Best for | Range against a wall/backsplash | Island or peninsula cooktop |
| Supply line | Stubbed out through the wall, 18–20 in. above counter | Run up through the countertop/cabinet base |
| Mounting height | Outlet 8–12 in. above cooktop surface | Base at counter level; arm rises then folds down |
| Horizontal position | Centered over back-center burner | Beside cooktop, within arm reach of all burners |
| Counter space used | None | Small footprint beside range |
| Reach needed | 18–24 in. articulating arm | Longer arm to clear the cooktop edge |
Whichever you pick, the folding-arm concept and the “reach the farthest burner” test are identical. The finish should also match the rest of your kitchen hardware — if your main faucet is a warm metal, coordinating the pot filler is the same logic we cover in choosing the best kitchen tap design for your sink.
What clearances and code rules affect pot filler placement?
The two clearances that trip people up are the range hood above and the gas-range wall spacing behind. Your pot filler’s folded arm must clear the bottom of the hood, and on some gas ranges the manufacturer specifies a minimum non-combustible clearance behind the unit that affects how low the fixture can sit.
There isn’t a single nationwide plumbing code line item that says “a pot filler must be X inches high” — placement is driven by fit, safety, and the fixture manufacturer’s install sheet. But a few real constraints apply:
- Hood clearance: measure from the counter to the underside of your range hood and make sure the folded arm and its escutcheon fit comfortably below it. Tall commercial-style hoods hang lower than you’d think.
- Backsplash finish: the escutcheon must seat against finished tile, so the stub-out depth has to account for backer board plus tile thickness.
- Shut-off access: best practice is a dedicated shut-off valve on the supply line, accessible behind the range or in the basement/cabinet below, so you can isolate the pot filler without killing water to the whole kitchen.
- Cold-water only: never plumb a pot filler to hot — it’s designed and gasketed for cold supply, and hot water isn’t needed for filling pots you’re about to boil anyway.
Because the fixture sits in a heat-and-grease zone, material quality matters: look for a solid brass body and ceramic-disc valves rated for the pressure and temperature swings near a cooktop. That durability question is the same one we dig into in our breakdown of brass vs. stainless steel faucet manufacturing.
How do you install a pot filler at the right placement, step by step?
Install a pot filler by roughing in the cold supply and mounting bracket at 18–20 inches above the finished counter and centered over the range, then attaching the fixture after the wall is tiled. The critical work happens during rough-in; the finish install is quick.
- Confirm the center line. Mark the exact horizontal center of your range on the wall and carry that line up to the target height.
- Set the height. Measure 18–20 in. up from where the finished countertop will sit (account for counter thickness if it isn’t installed yet).
- Rough in the supply. Have the plumber run a 1/2-in. cold line to a stub-out and secure the mounting bracket/backing block to the studs so the fixture has something solid to bolt to.
- Add a shut-off valve. Install an accessible isolation valve on that line.
- Close and finish the wall. Drywall, backer board, and tile go on, leaving the stub-out proud at the correct depth.
- Mount the fixture. Thread the pot filler onto the supply, seat the escutcheon flush to the tile, and hand-tighten with a wrench and thread sealant per the manufacturer’s sheet.
- Test. Turn on the shut-off, extend the arm fully, run water, and check for leaks at both the wall joint and the mid-arm joint. Fold it flat and confirm it clears the hood.
If you’re comfortable swapping your own kitchen fixtures, this is a very doable DIY once the rough-in is correct — similar in difficulty to the tasks in our guide on removing an old kitchen faucet the right way. The rough-in itself, though, is best confirmed by a plumber if you’re opening a wall.
FAQ
How far above the stove should a pot filler be?
The spout outlet should sit about 8–12 inches above the actual cooking surface, which usually means mounting the wall supply 18–20 inches above the finished countertop. Verify it by placing your tallest stockpot on the back burner and leaving 3–4 inches of clearance above its rim.
Should a pot filler be centered over the stove or off to one side?
Center it horizontally over the range, aligned with the back-center burner. Centering lets the articulating arm swing to reach any burner and fold flat symmetrically against the backsplash; off-center mounting sacrifices reach to the far side.
Do pot fillers need hot water?
No. Pot fillers are cold-water-only fixtures with a single 1/2-inch supply line. You’re filling pots you’ll heat on the stove anyway, so there’s no hot line and no drain to plumb, which makes the rough-in simpler than a sink faucet.
Can you add a pot filler without opening the wall?
For a true wall-mounted pot filler, you almost always need to open the wall to run the cold supply and secure backing for the mount. If opening the wall isn’t an option, a deck-mounted pot filler that draws water up through the countertop or an existing nearby line is the practical alternative.
Is a pot filler worth it, or is it just decorative?
It’s genuinely useful if you regularly fill large or heavy pots — stockpots, canning kettles, pasta pots — because you fill them where they cook instead of carrying sloshing water from the sink. If you rarely cook in big vessels, it’s more of a style statement, so weigh it against your actual cooking habits.
What finish should a pot filler be?
Match it to your range hardware and main kitchen faucet — brushed nickel, matte black, chrome, or a warm bronze are the common choices. Because it sits in a grease-and-heat zone, prioritize a durable PVD or quality electroplated finish on a solid brass body so it wipes clean and resists corrosion.
A note on quality, testing, and who wrote this
This guide was written by the iVIGA product team, drawing on our experience designing and manufacturing kitchen and bathroom fixtures shipped worldwide. iVIGA (www.viga.cc) builds faucets with solid brass bodies and ceramic-disc cartridges, and our pot fillers and kitchen faucets are pressure- and cycle-tested and produced to recognized international standards such as cUPC and NSF/ANSI 61 for drinking-water safety, backed by our product warranty. We recommend always following your specific fixture’s installation sheet and local plumbing code, and consulting a licensed plumber for any work that opens a wall. Our aim here is simple: give you the exact measurements and reasoning so your pot filler lands in the right place the first time.
WeChat
Scan the QR Code with WeChat